Manage Data Tables
Finflux data-table allows the user to add custom fields in addition to the built-in fields to a client profile, loan/saving account, group, center or an office.For example, you may want to collect additional client details, such as education, poverty level. You can do this in Finflux by creating a data-table, choosing the client application table name and adding custom fields: education and poverty level.In another example, you may want to collect additional loan details, such as business name, business type, monthly cash flows, and outstanding liabilities. You can do this in Finflux by creating a business details data-table, choosing the loan application table name and adding custom fields business name, business type, monthly cash flows, and outstanding liabilities.When creating a set of custom fields (i.e., data-table), you can set multi-row option to capture multiple instance of data. And custom field supports 6 data types (String , Number, Decimal, Date , Text and Dropdown)
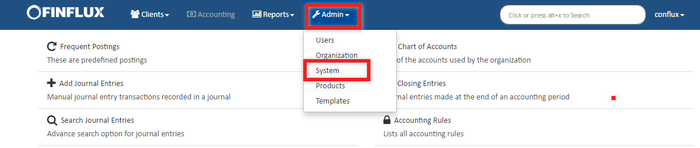
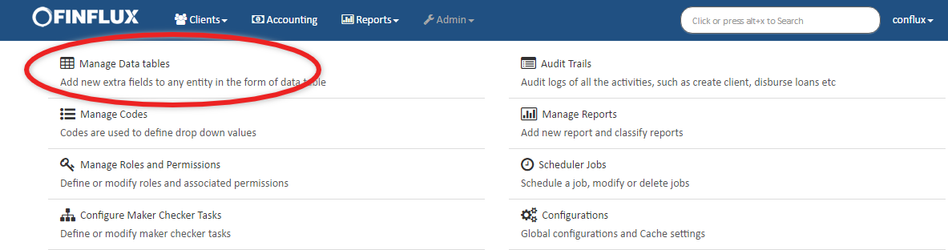
Beginning at the main screen, select Admin,/System from the drop-down menu. This will launch the System menu.Select Manage Data Tables.
View Data Tables
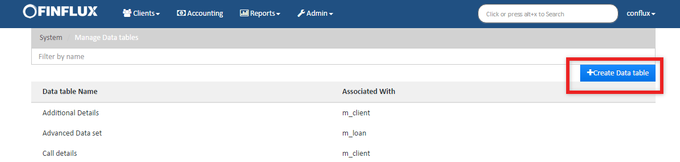
Once you have have selected Manage Data Tables Finfluxwill generate a list of all currently available data tables. This will appear in alphabetical order, but you may filter the results by using the Filter by Name field at the top of the list. To view more detail on a data table, click on its name in the list - it will highlighted blue when the cursor is hovering over it. 
Create New Data Table
Once you have navigated to the Manage Data Tables screen, you may create a new data table. Click the blue Create Data Table button at the top-right of the screen to add a new data table.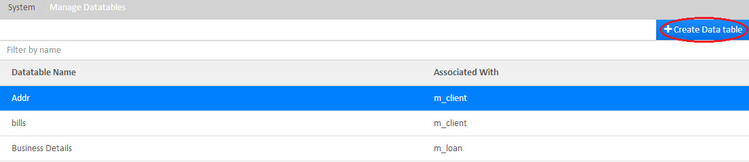
Modify Data Table
Once you have selected a data table from the Manage Data Tables screen, you may modify it. Click the blue Edit button at the to-right of the screen to modify the table.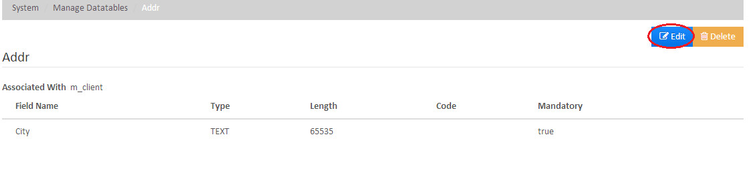
Delete Data Table
Once you have opened a data table page you may delete it. To delete a data table:
- Click on the data table name in the list of available tables at the View Data Tables screen.
- Click on the orange Delete button at the top-right of the screen - this will launch a pop-up window to confirm the deletion.
- Click the blue Confirm button to delete the data table.
Adding custom fields
To add custom fields to a data table, do the following:
- On the Finflux toolbar, click Admin, and then click System to open the System menu.
- On the System menu, click Manage Codes to open the Manage Codes dialog.
- In the Manage Data tables dialog, click +Create Data table.
- In the Data table name box, enter a name for your data table.

- Select the table name from that Application table name drop-down list you want your data table connect to.

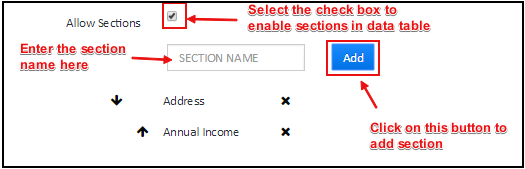
- Select "Allow Sections" to enable Sections in Data Table. Later add section names as shown in the fig below.
- Under Add Columns, enter the name of the field in the Column name box and select column type from the column type drop-down menu. Click the plus (+) to add your custom field.
Note: Repeat until you have entered all custom fields.
- To make the field required, click the Mandatory checkbox. For String fields, in the Length box, enter a maximum number of characters for the field. For Drop-down lists, from the Code drop-down list, select a system defined code. To delete a field click the delete
") button.
button.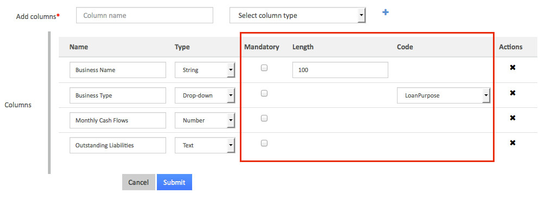
- Click Submit add the custom fields to your data table.
Meta Data
Meta Data is an advanced settings done to configure UI by giving displaying conditions like when to display, where to display, how to segregate it into section wise etc.,
Please refer Meta Data for detailed info.
Data Types
| Type | Usage | Example values |
|---|---|---|
| String | To capture names , address line, email-id | Stev, Nayan, 17th Cross, info@mifos.org |
| Number | To capture age, number of children, number of earning members | Ex: Age = 23 |
| Decimal | To capture income, monthly expnese, interest rate, growth rate | 100.50, 1200.5, 10.25 |
| Date | To capture date of birth, joining date | 21-Jan-1983, 17-Jan-2013 |
| Text | To capture person description or bussiness description | "I have started this business 3 years back with self saving, now want to expand and looking for loan" |
| Dropdown | To capture relationship, qualification, employment type or any pre-defined values | [Father, Mother, Sister, Brother] , [Self employed, Govt employe]] |