Client Charge
Step 1: Pay Client Charge.
Initially Create Client Charge and Add Client Charge. Then click on the Pay button as shown in the fig 2.1 or navigate to more>>Charge Overview. Click on the charge and click on the "Pay" button to pay the charge.

fig 2.1 Pay Charge
The Pay screen will be as shown in the fig 2.2. Fill all the info and click on submit.
| # | Field Name | Description |
|---|---|---|
| 1. | Amount | By default the charge amount defined while adding a charge will be display here. This field is editable. |
| 2. | Transaction Date | By default the due date defined while adding a charge will be display here. This field is editable. |
| 3. | Payment Type | This is a drop down where all the payment types are populated. Select one of the payment type. Refer Payment Type |
| 4. | Account# | Enter bank account number here |
| 5. | Cheque# | Enter cheque number here |
| 6. | Routing Code | Enter routing code here |
| 7. | Receipt# | Enter receipt number here |
| 8. | Bank# | Enter bank name here |
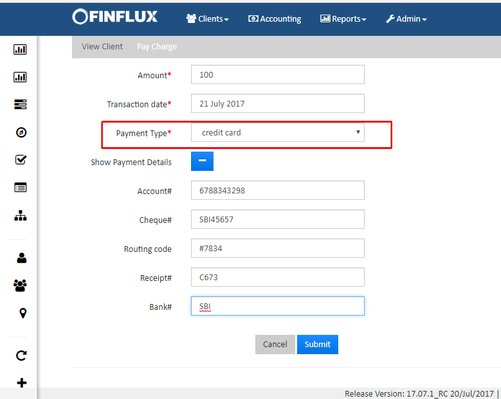
fig 2.2 Pay Charge Screen
Step 2: View Client Charge
To View the paid charge go to Client>>more>>Charge Overview. The View screen will be as shown in the fig 3.1. Click on the charge details to view detailed client charge. This will navigate to the screen as shown in fig 3.2.
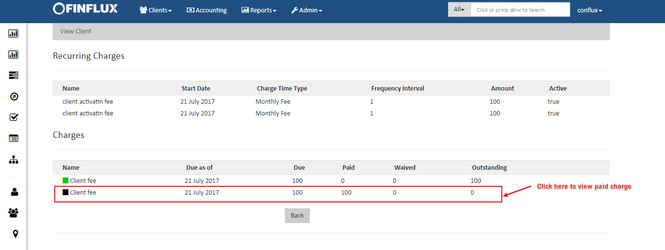
fig 3.1 Charge Overview

fig 3.2 View Charge
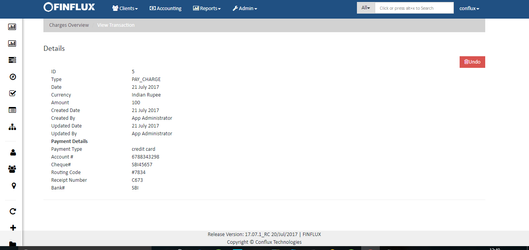
fig 3.3: Detailed view charge screen
Step 3: View Journal Entries
For an example the fund source (Asset account) for the payment "credit card" selected is "asset1" and the income account selected while creating charge is "Income from Client". Hence when the client charge is paid the transaction happens as described in the table below. Refer Advanced Fund Source Mapping to understand the usage.
| Account | Transaction |
|---|---|
| Asset account (selected while creating Financial activity mapping) | Debit |
| Income account (selected while creating Client charge) | Credit |
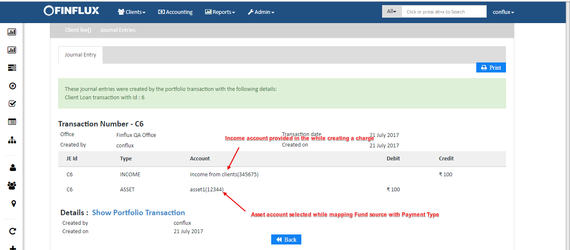
fig 4.1 Journal Entries