1.Create New Client
On this page:
1.1 How to On-board new client?
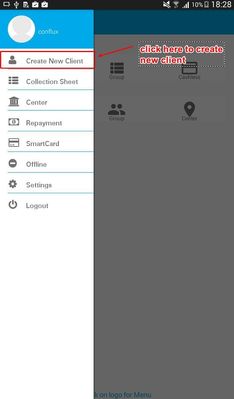
To on-board new client click on Create New Client link as shown in the figure below.
Step 1: Create New Client
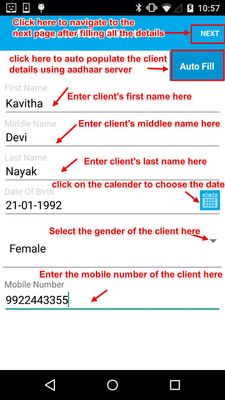
Clicking on the Create New Client will navigate to the "Create New Client " screen. Fill all the required details as shown in the figure below.
| # | Field Name | Description |
|---|---|---|
| 1. | Auto Fill | Auto Fill is one of the best feature added in this application. All the filed details are added automatically using aadhaar service. |
| 2. | First Name | Here you need to fill the client's first name. This field is mandatory |
| 3. | Middle Name | Here you need to fill the client's middle name. |
| 4. | Last Name | Here you need to fill the client's last name. This field is mandatory |
| 5. | Date Of Birth | Here you need to select the client's date of birth. This field is mandatory. |
| 6. | Gender | Here you need to select gender of the client. |
| 7. | Mobile Number | Here you need to fill the client's contact number. |
| 8. | Next | After filling all the client details, click on this button to navigate to the client address screen. |
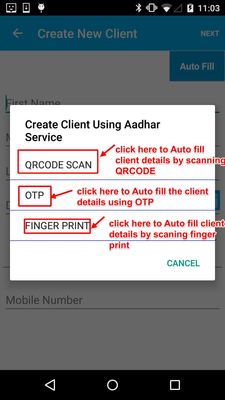
a) Auto Fill (online)
Client's details can be auto populated using Aadhaar service and this can be done only if in online not for offline. This can be achieved in three ways.
| # | Field Name | Description |
|---|---|---|
| 1. | QRCODE | Clicking on this link and scan the QRCODE present in the Aadhaar card to auto populate the client's details. Note: The camera pixel should be more than 5M pixel. |
| 2. | OTP | Click on this link and provide the Aadhaar number. OTP will be sent to client's contact number which was provided for the registration of Aadhaar. Enter the OTP to auto fill the client's details. |
| 3. | FINGER PRINT | Click on this link. Enter valid Aadhaar number and take the finger print of the client to auto populate client's details.. Note: To enable finger print Bluetooth device and finger print device should have been selected. ref 7.Settings |
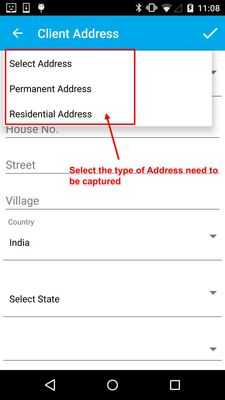
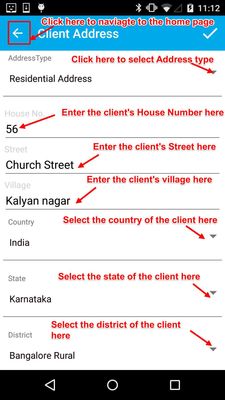
Step 2: Fill the client's address details as shown in the figure below
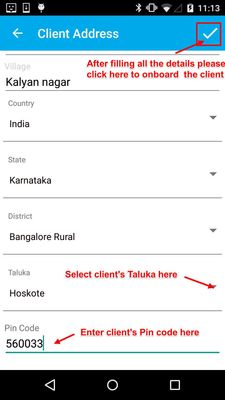
Clicking on the next button in "Create New Client" screen will navigate to this screen where following address details should be provided. Click on the tick mark icon to submit on-board the client and this will navigate to the client details screen.
| # | Field Name | Description |
|---|---|---|
| 1. | Address Type | Click here to select the address type. This field is mandatory. |
| 2. | House No | Fill client's house number here |
| 3. | Street | Fill Client's street details here |
| 4. | Village | Enter the Village details of the client here |
| 5. | Country | Select client's country here |
| 6. | State | Select client's state here |
| 7. | District | Select client's district here |
| 8. | Taluka | Select client's taluka here |
| 9. | Pin code | Enter valid Pin code here |
How to create client in offline?
Follow Step 1 (Except Auto fill) and Step 2
Step 3: Edit Client
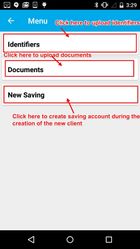
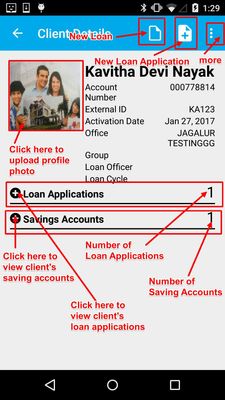
After step 2 the application navigate to the client page where you can edit the details ( Edit Client and Edit Address). Here you can upload the identifier, documents and can also add savings using more option as shown in the figure below. Here you can also upload the profile photo of the client.

Step 4: Push Clients to the server
Now the client details are saved locally in offline. So you need to push the client details to the server to onboard the client. Refer 6.Offline
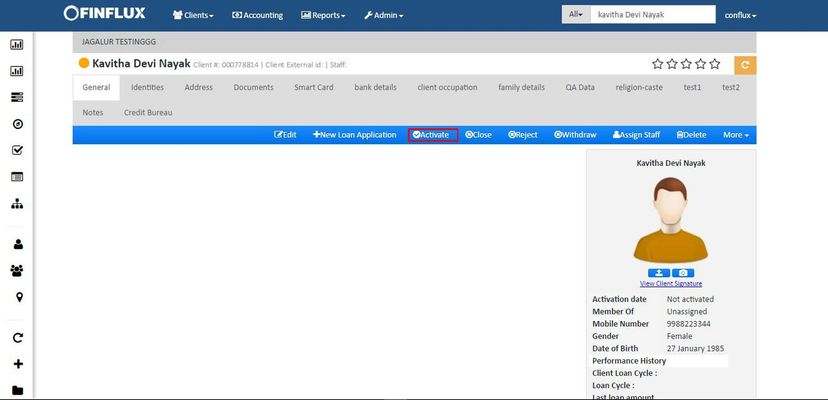
1.2 How to activate on-boarded client
After successful on-boarding of Client will navigate to the "Client Details" screen as shown below. Since no permission provided to the staff/user/LO to activate the on-boarded clients via mobile application the clients will be in inactive state until the admin activates them.
Step 1: Activating newly On-boarded clients.
To activate the on-boarded clients the admin should search the clients and should navigate to their respective page. Clicking on the Activate button will activate the on-boarded clients.
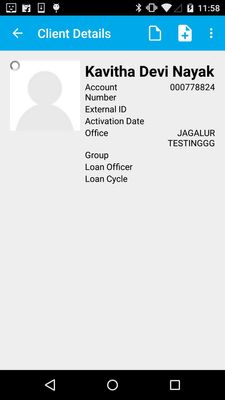
1.3 Client Details
The client details screen will be as shown in the figure below
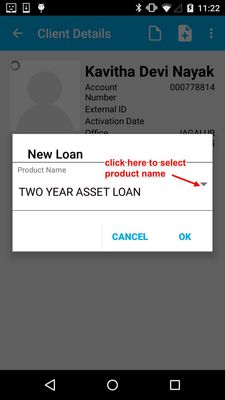
1.3.1 How to Apply for New Loan
Step 1: Select the Loan product and click ok.
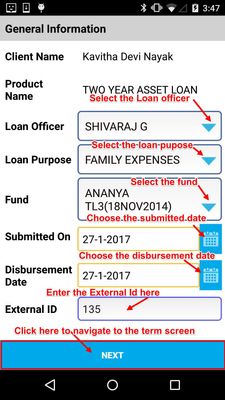
Step 2: Fill all the general information required as shown in the figure below and click on next.
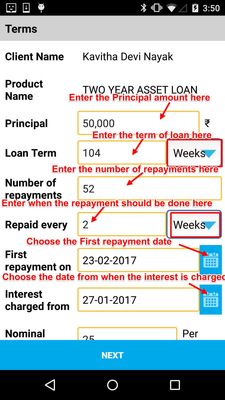
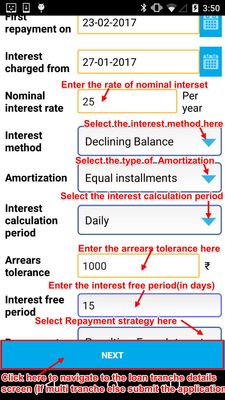
Step 3: Fill the terms details. If the selected product is single tranche loan then the "submit" button appears instead of "next" and hence by clicking on submit button ,the new loan gets submitted. If the loan product if of multi tranche loan then the click on next button as shown in the figure below and this will navigate to the tranche details screen.
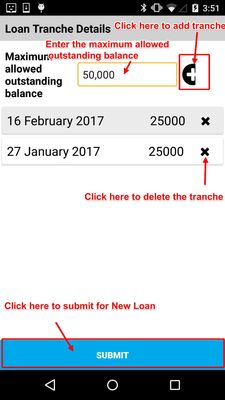
Step 4: Provide the tranche details and submit the new loan.
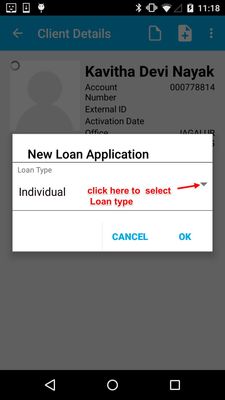
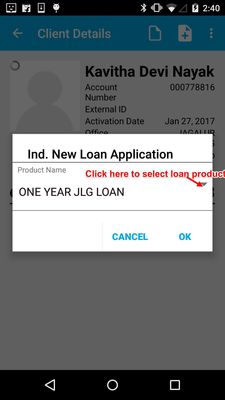
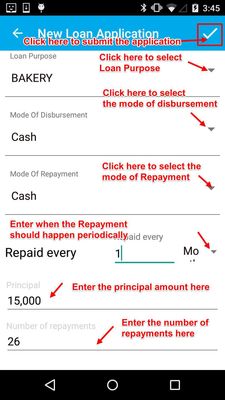
1.3.2 How to apply for New Loan Application?
Step 1: Select the loan type (individual or JLG) and click on OK.
Step 2: Select the loan product and click on OK. This will navigate to the New Loan Application screen.
Step 3: Provide all the required details as shown in the figure below and click on tick mark to submit the application.
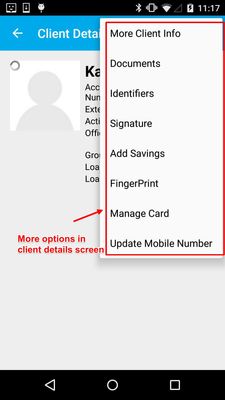
1.3.3 More
More has following options
| # | Fields | Description |
|---|---|---|
| 1. | More Client Info | This contains additional information of the client |
| 2. | Documents | Upload and manage client's documents here. |
| 3. | Identifiers | Upload and manage client's identifiers here |
| 4. | Signature | Upload and manage client's signature here |
| 5. | Add Saving | click here to add Saving account |
| 6. | Finger print | Click here to register and authenticate the finger print |
| 7. | Manage Card | Click here to manage the smart card |
| 8. | Update Mobile Number | Click here to update the mobile number. |
a) More Client Info
b) How to upload and manage Documents?
Click on Documents will navigate to the Client Document Screen as shown below where the uploaded documents are listed. Clisk on plus button to add new documents where you should provide Name of the document, description to the documents and the Picture of the document should be uploaded.
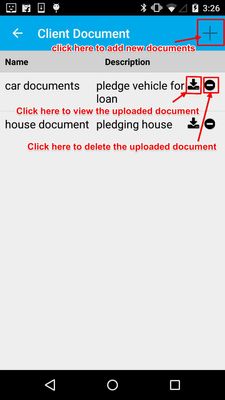

The documents uploaded will not automatically upload, the documents need to be pushed to the server manually. To achieve this click on logo, go to offline>>Push Documents

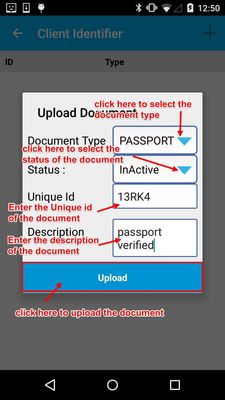
c) How to upload and manage Identifiers?
Click on Identifiers will navigate to the Client Identifier Screen as shown below where the uploaded Identifier are listed. Click on plus button to add new Identifier where you should provide Document Type, Status of the identifier, its Unique Id and its description.
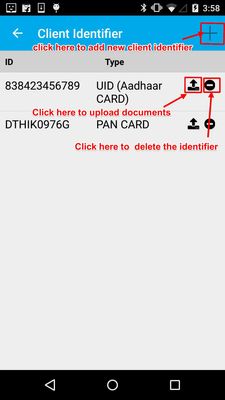
All the documents should be pushed to the server manually as shown in the figure below.
d) How to upload and manage Signature?
Click on Signature will navigate to the Client Signature screen. Click on the plus icon to upload the photo copy of the signature. Select any one of the option (take picture or choose file) to upload the signature.
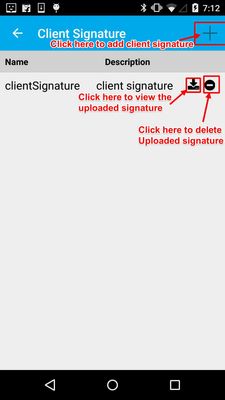

All the documents should be pushed to the server manually as shown in the figure below.
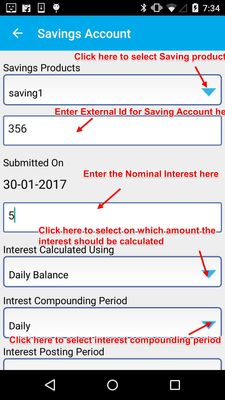
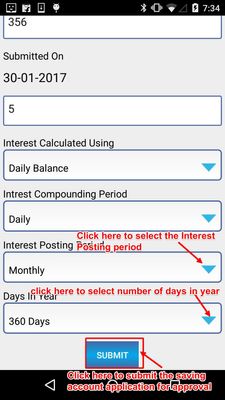
e) How to Add New Savings Account?
Click on the "Add Savings" will navigate to the Savings Account screen. Provide all the required details and click on submit
f) Finger Print
Finger print is the feature added to authenticate the client. In this option Initially the finger print should be registered and using this registered finger print authentications are done.
Note: 1.To use this feature Bluetooth and Finger print device should be enabled. refer 7.Settings
2.Finger Print is supported only for aadhaar services.
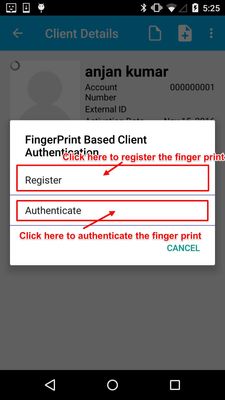
(1) How to register Finger Print?
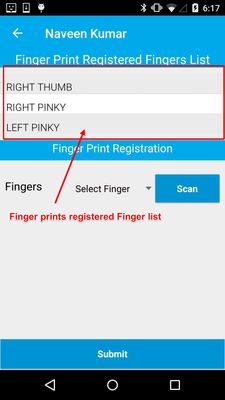
In finger print registration all 10 fingers are allowed to register. All the fingers registered are listed as shown in the figure below which will be used for authentication.
Step 1: Click on "Register" to register the client's registered finger prints. This will navigate to the Finger Authentication Screen
Step 2: Select the finger and click on scan. The system will ask to place the finger on the FPS (Finger Print Scanner). Place the client's finger on scanner and capture the print.
Step 3: After capturing the finger print successfully click on submit to register the client's finger print

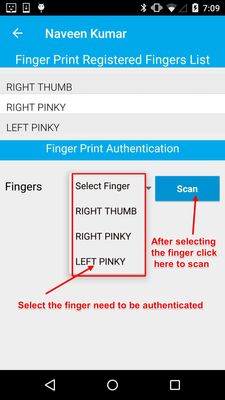
(2) How to Authenticate finger print?
Step 1: Click on Authenticate to authenticate the client's registered finger prints. This will navigate to the Finger Authentication Screen
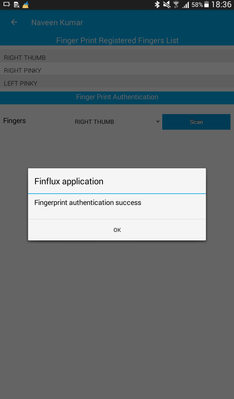
Step 2: Select the finger and click on scan. The system will ask to place the finger on the FPS (Finger Print Scanner). Place the client's finger on scanner and capture the print. And gives the result as Authentication Success or failed.
g) Manage Card
This is one of the best feature implemented in this android application. Using this card the client can be detected very easily instead of searching for client form the huge list of clients. To use this feature the smart card reader is necessary and the card has to inserted into the smart card reader for smart card operations.
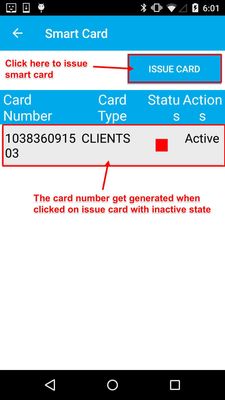
(1) How to issue smart Card?
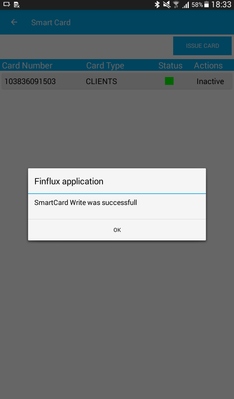
Step 1: Click on manage card. This will navigate to the Smart Card screen as shown below.
Step 2: To issue the card click on "Issue Card" and this will generate the unique card number of the client, but the card will be in inactive state.
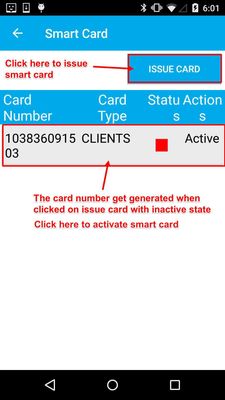
(2) How to Activate Smart Card?
Step 1: Insert the card to the smart card reader and register the finger prints
Step 2: Click on the Actions "Active" as shown in the figure below. This will navigate to the Finger Print Authentication screen
Step 3: Select the finger from the list need to be authenticated to activate the smart card.
Step 4: Click on scan and the system ask to place the finger on FPS. Place the client's finger (selected for authentication)
Step 5: If authentication is successful the below pop-up appears. Click on OK.
Step 6: The following pop-up appears saying that "SmartCard Write was successful". Click on OK. Here you can also inactivate the card by clicking on the action "Inactive".
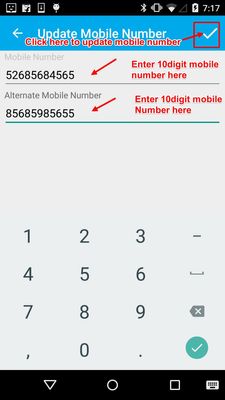
h) How to Update Mobile Number?
Click on "Update Mobile Number", this will navigate to Update Mobile Number screen. Update the mobile number and click on the tick mark as shown in the figure below.